Sunday, July 26, 2015

I Went to Hawaii and Broke My Fabric Diet

If you've always wanted to go on a family vacation, but separation from your fabric stash gives you hives, here's the solution: Kauai!

The scenery is supernatural - azure waves, meandering rivers, lush jungles, gravitationally-obedient waterfalls - but best of all, this Hawaiian island has three of the most spectacular fabric stores I've ever seen: Vicky's FabricsDiscount Fabric Warehouse, and Kapaia Stitchery. Their offerings were so tantalizing that I broke my years-long fabric diet (not buying new fabric except in the frequent case of psychological emergency) and gobbled up a yard or three.

You'd think that fabric prices would be higher in Hawaii, and you'd be right. Quality quilting fabric that's about $10-$12 a yard in LA is about $12-$13 a yard in Kauai. But even at $13, it's about the same price and lower in calories than the 11-ounce bags of tourist macadamia nuts.

All three of these shops have beautifully curated collections. The employees were beyond helpful - I had deep. meaningful conversations with them. What a joy!

I visited Vicky's Fabrics in Kapaa on our first day. It looks small, but they stack and pack a lot inside. Half the store is quilting-potential fabrics - batiks, solids, orientals, etc.  I couldn't resist a yard of this regal print:
I needed it! My 16-year-old might get married some day!! There are also abundant tropical prints (more than this picture shows)....

Down in the front, you can see bolts from Robert Kaufman's Indigo line. I'd never seen this fabric line in my own LQS, and I was thunderstruck! So I bought a yard of this:

Vicky's also had dupioni silk that's just about the same price as in LA's fabric district, at about $20 a yard. They had one especially deep blue/green dupioni that I didn't buy, but which got stuck in my head. 
For the next five days, we didn't visit any fabric stores, but I was thinking about color. It's overwhelming trying to parse them all. Especially blues. Here's that dupioni's slate blue, in the volcanic rocks, plus turquoise galore.......dark azure...

...dark to silvery/touched by angels...

...greens and blues...
The day before our departure I tricked the family into taking me to the remaining two fabric stores, close to each other in Lihue. First, Discount Fabric Warehouse. What it lacks in atmosphere, it makes up in price and selection. I came across a bin with 54" wide rolls of Japanese-manga-inspired fabrics, on sale from a mere $7 to an even more mere $3.50 a yard!
It's not highest quality fabric - it's kind of thin - but it's awesome and geeky and Harajuku and 54" wide!! And did I mention it was 4 bucks a yard?

(When I handed the clerk my credit card, she got excited and asked me if I'm related to David Perlmutter of "Grain Brain" fame, Not that I know of, I told her, but I hope I might inherit some of the millions he's made with his depressing-yet-iffy killer bread hypothesis. That led her to mention his views on C-diff., the hospital-borne infection related to antibiotics wiping out good gut flora. There's a new development in C.diff. treatment - fecal donation - the clerk raised it first, not me - and she said it was not an idea she could never bear. I said I bet she could if it might save the life of a loved one - then I shared that my father died from a C.diff. infection two years ago, and no doctor mentioned the donation possibility - I would have gladly shared whatever substance I could possibly extrude if it might have saved his life. It was a lovely conversation, really!)

My final stop was  Kapaia Stitchery in Lihue.

If Disneyland created a Hawaian stitching store, it would look like this. Jam-packed with gorgeous fabrics, products made from those fabrics, and COLOR
If you forget to bring a hand project on your vacation, they sell carry-along Hawaiian applique pillow kits to keep you happy stitching on the beach while your family is swimming, sunning, snorkling, surfing, and stand-up paddling.

By the counter, they were selling precuts of their signature batik fabrics for a mere $10.99/yard  - mainland prices! - How could I resist these ferns?
And customs won't let you out of Hawaii without a sea turtle batik:
On our last day, we happened to stop for coffee near Vicky's, so I ran in one more time, to buy  a quarter-yard of the deep blue dupioni above that I'd been coveting, gold dupioni to keep it company, and one more piece from the Indigo collection:
(With the clerk - the same lovely and hard-working young woman who had served me six days earlier - I wound up in a conversation about physical disabilities, scars, and weight issues, and thoughtless comments people make about these challenges. It was a conversation that moved me greatly - I left the shop with a bag of fabric and a treasure in gratitude for meeting her in particular, and the luxury of a Hawaiian shopping vacation in general.)

We also stumbled across two yarn stores, where multi-hued Hawaiian-dyed yarn sells for around $29/skein. Twisted Turtles Yarn Shop in Lihue, has a wide selection of mainland as well as Hawaiian yarns. Hanalei Strings is a unlikely combination ukulele/yarn shop, carrying mostly the gorgeous Hawaii-dyed skeins. While my DD and DH browsed a spectrum of brightly-colored ukuleles,
I browsed yarn like this,
Something for everyone!
In conclusion, some of the colors in Hawaii aren't blue or green. There's also a ton of purple, and tropical flower colors, and the complicated sunset presentation.
Plus, the famous Hawaiian dirt color:


There's an entire industry of tourist shirts dyed with the earth. 
Chickens are ubiquitous, so add more ocher, and coxcomb colors to the mix: 
More Kauai tips: Try the beet salad at Tiki Iniki in Princeville. Colorful and insanely delicious. And your bill comes like this:
 The Na'apali Coast tour is totally worth it. Keep close track of your prescription glasses when you go in the water - I think the chickens on Anini Beach stole mine. (Reward for return!)

Sunday, July 12, 2015

From Shredded to Wedded: A Silk Scrap Quilt for Oldish Newlyweds

Normally I wouldn't think of making a scrap quilt for a wedding - the newlyweds should get something shiny and, well, new, right? Certainly not some old selvage-ridden crumpled unravellings from the scrap bin?

But what if it's a second wedding? And what if both lost their beloved first spouses to long illnesses? And what if both are beaming with joy? And what if they specified "no gifts," instead suggesting people donate money to cancer research, and we did that, too?

All those reasons, plus the fact that my previous highly disciplined dupioni silk project left me with a lot of scraps, and a burning desire to relax and have fun with the luminous color and texture, without worrying about dye running or turning edges under. Along with small pieces of fabric, previous projects left me with flying spaghetti monster clots like this:
So I cut 3" square pieces of tear-away stabilizer, covered each with a same-size square of of dupioini,  and flung scraps, selvages, threads, etc. all over them.

Then I stitched them together and set them on a long piece of shiny white  dupioni. 
I called it "From Shredded to Wedded." . I stitched a hanging sleeve and included a dowel cut to size on the back.
Disregard that lower right hand corner. Why does this always happen to me when I do a pillowcase finish? Oh wait, it's on purpose! It demonstrates that nothing is perfect, but we must still continue forward, and celebrate life. L'Chaim!


P.S. Shared on Nina Marie Sayre's Off the Wall Friday! Check it out for more art quilts! http://ninamariesayre.blogspot.com/.


Sunday, July 5, 2015

Mappliqué, a Jerusalem Journey, and Near-Dyeing with Dupioni

I felt both excitement and fear when a California family contacted me with a request for a tallit, a prayer shawl, that would be used in a bat mitzvah held at the Western Wall - in a month.  I had other commitments, and couldn't start working on it for a week. Three weeks is not a lot of time. 

They wanted a tallit that would reflect their daughter's interests. They also wanted it to illustrate the theme of "journey." 

I immediately thought of flying geese, a traditional patchwork pattern: 
( I have used them in matzoh covers to represent Exodus/
For tallit purposes, they could also represent a trip to Jerusalem. So I sent the client some quick sketches: 
The Hebrew is a nonsense placeholder
Meh. They weren't impressed. I had to up my game. 

I decided to look up maps of Jerusalem.  I found this wonderful 1660 map on the Library of Congress website. 
At the time, I was also working on the quilt I described two weeks ago, and last week, inspired by Caitlyn Jenner and vintage phrenology charts...
It immediately hit me that the Jerusalem map bears an eerie resemblance to my appiqué brain, upside down. I thought the map would make a similar abstract design, with similar construction methods. I did some quick computer drawings, showing the client how I might trace and abstract the map shapes:
The clients wanted magenta, lime green, and a little gold, thus these colors: 
They loved the idea! The next question was whether they wanted the map in two segments (one at the bottom of each tallit end), or one piece (across the back) I did two more computer-sketches:
\
Again, nonsense Hebrew, showing where the collar might be. 
They picked the first above. And they also wanted dupioni silk. 

Three seconds after I said "yes," I realized I was in trouble. 

The brain quilt was relatively quick and easy because I used well-behaved cottons, raw edge appliqué, and fusible web. But for the tallit, all the edges of all those pieces would have to be turned over, because dupioni frays when you glare at it, which you will.  Turning and stitching so many pieces was going to take a very long time. (If only I'd consulted quilter Cheryl Lynch's blog, I would have learned about a fusible that works well with dupioni!)

But I didn't, the clock was ticking, the contract was signed, and there was nothing to do but....
Engage! (speaking of  journeys.)
I began by importing the map into my favorite art program (CorelDraw). I printed it out to legal size, then brought it to a copy shop, where they upsized it to 50". (for stripes that wind up about 24" wide, the width specified by the client.)
I taped it to my patio doors, and then taped freezer paper, waxy side down, over it. (the freezer paper is not really brown - it's white.)

I traced all the pieces. If they were tiny, I combined them. I wound up with over 100 pieces. I combined some of the tiniest pieces, to bring it into the realm of feasability. 
To save shipping time and maximize certainty, I shopped for the fabrics in person rather than ordering online. My friend Linda and I spent an afternoon in downtown Los Angeles, which is a joyful adventure if you're not working on deadline, but can be stressful if you are. We found a shop with a fantastic assortment of dupioni colors. After hours of juggling and comparing, here's the palette we purchased: 
The photo doesn't do these fabrics justice. They have a gorgeous luster. I specifically asked the shopkeeper if the colors were colorfast. he asserted they were. (He lied: See Dupioni Near-Dyeing, below). Linda and I added shades that we felt toned down the deeper colors. The white is more like vanilla, to echo Jerusalem stone. 

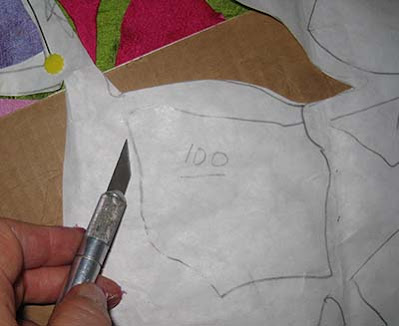
The first step was to cut the green fabric to 18" x 50",  and lay the freezer paper pattern on top. Then came the meditative process of cutting each paper piece, one by one.  I used an xacto knife, and slid cardboard between the freezer paper and tallit front. 
Once each piece was cut out, I brought it to the ironing board and pressed it to the dupioni: 
Cut the fabric about a quarter inch or so beyond the template outlines
Clip concave curves. Working from the back, add dabs of  school glue (It dries clear). 
Keeping the paper on, working from the back, turn under and press all the edges. Then slide the piece back in position. (It was here I realized I had a dupioni dye problem*. See below. Once I'd resolved that problem, I continued.)
 Peel away the top freezer paper. Glue edges, one by one, in position onto the green background. 
 Hand-press in place.
Glue a dozen or so. To place each correctly, align the previous pieces with the previous holes. 
 Every foot or so, I placed tearaway stabilizer behind the segment. Then, I rolled the sides, inward, incorporating the stabilizer and the freezer paper (and smushing it. It's sturdy and didn't tear). 
Next, I carefully manipulated the mass/mess under the machine's presser feet. It's awkward, especially in the beginning. The more you do, however,  the more freezer paper you can remove from the completed side, so  it gets easier. I surrounded each piece with a zigzag stitches, using metallic gold thread and a Microtex needle.

Once stitched, the backing stabilizer must be torn carefully away. 
(See any resemblance to the original map?!)
It gave me spilkes to cut that thing in half. I stitched the pieces to a 25"x 72" piece of vanilla fabric. 
 When the tallit is shut, the map is complete. 
As  you can see above, there are no corners or fringe yet. This was the point at which I had to send it off. The client wanted machine embroidery galore - a Hebrew-embroidered collar strip, plus their daughter's name, plus personal symbols in the four corners, plus a statement about journeys - 7 embroideries in all. I don't have an embroidery machine. The family had found someone near them to do it in their time frame. 

I also made them a reversible kippah, from the pattern in my handy-dandy yarmulke book, with green on one side....
...and light magenta/pink on the other.
The case is heavily quilted with the same gold metallic thread used on the map pieces. 

That divine button had been looking for a good home for years! Yay! 
Ta daaa! Done with a few days to spare! 

One more tip: If you are interested in creating a mappliqué of your favorite town, be sure to check the copyright restrictions. The Jerusalem map I used did not appear to have any, judging from the Library of Congress information that came with it.
+++++++++++++++++++++++++++++++++++++++++++++++
*A Dupioni Near-Dyeing Experience
Silk dupioni comes in luscious colors and has a beautiful shine. It can also be very challenging to work with.

When I started turning under the edges of the first or second map piece, as described above, I realized to my horror that the spray starch I was using to harden the turned edges was causing the dark magenta fabric to leach. My fingers were turning deep pink.

Horrified, I cut a small piece of the magenta dupioni, soaked it in water, and placed it on a white paper towel. The latter quickly turned dark pink, confirming that I was in big trouble.

I called the store where I had bought the silk. The person who answered the phone spoke only one word: "No", including, when I asked why yesterday's clerk yesterday had promised me that the fabric was colorfast: "No;" When the shop's owner might return?"No;" "Later today? "No;" Tomorrow? "No." etc.

That was hopeless, so I called a reputable online store that sold dupioni silk for premium prices and asked them if their magenta was colorfast, thinking that if it was, I would order an overnight delivery. They told me that they did not guarantee color fastness for any their dupioni. They recommended dry cleaning only. I checked around with a bunch more online vendors - and they all said the same thing.

Google offered astonishingly little in the way of answers to: "How do you make commercial dupioni silk colorfast?" Online friends made very helpful suggestions, including steaming, boiling, rinsing with vinegar, and more. But no one had completely set leaching dyes in commercial dupioni.

I called Dharmatrading.com, a wonderful fiber art supply company. The customer advisor was herself a dyer, which brought my blood pressure down a few notches. She told me her procedure for making home-dyed dupioni colorfast: She simmers it on the stove in a gallon or so of water, adding a fourth cup of vinegar every 10 minutes. Then she rinses out the vinegar, and washes the fabric with synthrapol.

True, her home dye's chemistry was probably completely different from the commercial dye in my fabric. But hers was the most specific action plan that I had heard, and it incorporated elements that many people had mentioned.

I already had some Dharma Trading synthrapol from previous dye-running disaster; I ran to the supermarket for white vinegar, and set to boiling, stirring, vinagering, rinsing, synthrapoling, rinsing, rinsing more, drying, pressing and testing. I did all this on the magenta fabric only - thank heavens the other colors did not run.

The procedure didn't halt the dye release, but it brought the amount waaayyyy down. Fortunately, it didn't change the luster or the hand (which washing dupioni, especially in hot water, can do, so always test a sample first!)

The finished tallit was sent off with an explanatory letter specifying that they should strive to keep it dry, take it off if there's a miraculous July rain in Jerusalem, and dry clean it only. I purposely left the magenta out of the kippah and the carrying case, to minimize the danger.

While writing this up, I found some helpful resources in stitching and laundering dupioni (though none of them would have solved the violent running problem). Don't make anything from dupioni silk (or any other silk), until you read these:
  • Dry cleaning tips: http://www.thaisilks.com/images/sales/WashSilk.pdf   . If I had to do it all over again, and if I had had a bit more time, I might have bulk-dry cleaned the silk before cutting and sewing, as this site and my friend Diane suggested (Thanks, Diane!)
As for me, I'm going to think twice (and charge double) before I make another dupioni tallit - especially if it has any deep red/magenta in it.

I'd love to hear about your adventures with dupioni dyes.