Sunday, August 25, 2013

Scrap Strip Therapy: A Recipe for Relaxation

Sometimes you just need to sew scraps. Not think. Not drink. Just sew.

1. Cut or buy a standard-sized sheet of felt (close to 8 1/2" x 11"). I used black acrylic felt for this project. (If you need to press it, keep your iron  temperature low, and use a press sheet.)

2. Go through your scrap bin and find strips, from about 1/4" to 1 1/2" wide, 8" or so long. Unevenness and fraying are just fine! Selvages rock! Interesting yarns, cords, and threads count, too. If the fabric strips are wider than 3/4", cut gentle curves into them.
3. Lay the widest ones down first, slightly overlapping so no felt shows between. Then lay down the thin, thinner, and thinnest strips. Finally, add any yarns or cords. Strategic smears with a temporary glue stick can hold things down.

4. When the glue is dry (press to speed that up, at a not-too-hot temp, with a press sheet), stitch everything in place with a wide zig-zag. You can use one stitch/one thread, or many. Couch in the fibers (couch = stitch over the top with a wide long zig-zag, so the cord still shows).

I mostly used gold metallic thread in my machine and a plain vanilla zig-zag.


5. Now find that Christmas/Chanukah/Kwanza gift list and start cutting! Here are five different bracelets/bookmarks/wall hangings (aka quiltlets) made from this strip set. All serve as excellent gifts!

Sample One: Cut out a rectangle the long way, to about 7".

 If you used naturey colors, you've got something that looks like an abstract landscape. It's a soothing wallhanging for someone's work station.

A mother of pearl button glows like a moon. Stitch a buttonhole in the other end, and you've made a cuff bracelet.


Cut strata into 1” x 1” squares, on the diagonal. Artistic one inch squares are known as ‘inchies.’ (Which, like Artist Trading Cards, are tradeable works of art! Believe it or not, there are onetwo entire books about inchies!)
Once you've cut all the inchies you want, zigzag stitch the squares together, butting raw edges. The stitches act as hinges. Here I arranged them like the central sliver of a  traditional "Log Cabin Barn Raising" quilt pattern. 

The kinds of people who love inchies are also tremendously fond of 'betwinchies', cut to 1 1/2” square. (And guess what Twinchies are?)


Or, cut out a wavy cross-wise section: 

Results look something like this: 

The gold 'sewing machine cord' was created on the machine, with water soluble stabilizer. It was then  couched to the background. and a loop was created at at the left end. A vintage gold metal button is added on the right.

And finally, with the leftovers from all of the above,  there's the  following amalgamation. I arranged inchies and wedges of black felt on water soluble stabilizer. Sandwiched the whole thing between another layer of the stabilizer, and then using gold metallic threads,stitched everything in place and added little thread curlicue protuberances coming off the top and bottom. 
 
There's a buttonhole on the far Western inchie, and a button on the far East.


Just remembering how I made these things causes my blood pressure to plummet (in a good way). If you've read this far, I suspect you feel the same way! 


Sunday, August 18, 2013

Fresh Veggie Fabric + Vintage Linens = Colorful, Healthy Life!?

Maybe because of Michele Obama, or maybe because our whole society is eyeing the fresh produce aisle (if not yet doing most of our shopping there), there are a lot of hyper-realistic fruit and vegetable print fabrics right now (for example, from Fabri-Quilt and Robert Kaufman).

Beyond the most obvious project idea  - tote bags  for farmers' or supermarket - there's this: Combine the prints with vintage linens to make a fiber-filled food pyramid pep talk reference wall hanging!

Why a food pyramid? To recap my earlier article and quilt, it all started in 1992, when the U.S. Department of Agriculture (USDA) issued a graphic to guide Americans' food choices. The stuff we were supposed to eat the most of was grain, which were therefore placed at the bottom.
Moving up, produce was in second place, dairy and meat third, and oils and sweets at the top, meaning eat the least. It was a bit confusing (shouldn't the top be the best?)

As it turned out, those amber waves of grain were inspired more by agribusiness than human health - they were giving Americans ample waves of cellulite. In 2011, the USDA and many nutritionists declared that, whoops, vegetables, not grains, should be the stars! And fresh fruits should costar! The new graphic: 

In response, in the real world (ie not at the sewing machine), I've tried to make over our family dinner plates. The plains of grains have shrunk to small puddles. Salad and fruit take up most of the room, with a little space for  meat or beans. Local Husband and I have lost weight since our towering grainery days, and feel much better.

Then, a couple of months ago, Quilts Inc. announced a "What's for Dinner" challenge. The requirements were to depict a plate full of food, plus napkins, silverware, and a placemat. That  was exactly the incentive I needed to update ye olde food pyramid.

This wallhanging includes two specific pieces of nutritional advice that have helped me: 
  1. Make vegetables and fruits the stars of your meals  (I think nutrition guru Joel Fuhrman put it that way), and
  2. Eat only foods your great-grandmother would recognize as foods. (i.e. she would not know what to do with a gummi bear.) (This one came from noted food writer  Michael Pollan). I hung that wisdom from a fridge-button:

The background is a rectangular vintage linen table runner (or maybe a dish towel?). I was moving too fast to apply fusible interfacing to the rear side, which I regret - like many linens, this piece rolled around defiantly; thus my rectangle came out somewhat off kilter. I'm not sure if the vintage powder blue floral trim around the edges make it more or less obvious that the corners aren't quite square.

The napkin is another vintage linen, which came with that very cool curlicued turquoise border. (I still have four more identical napkins searching for a purpose). I appliqued a Kaffe Fassett chard bouquet on top of  the napkin, and stitched the whole thing down with  layered buttons to serve as napkin ring.

Down along the right side of the pyramid , I free-motion quilted advice for each level – at the top, by the sweets, red meat and tortilla chips, it says “Eat Little”


By the nuts, avocados, chicken, fish, and grains, it says “Eat Moderately”; 
[That's supposed to be a chicken, not Tweetie Bird.]
and at the bottom, by the fruits and vegetables, I stitched “Eat Lots and Lots.”.

Isn't this tossed salad fabric amazing? 
(It includes lettuce red onions, mushrooms, cucumbers and cherry tomatoes). 

There's also silverware (made from small-scale produce fabrics, plus a millenium fabric).
Alas, my piece was not juried into the show. The rejection email specifically stated, "Don't be discouraged," but of course, I was. Since then, I've cheered up. That challenge spurred me to make something that I'm now quite liking! Anything that combines excellent novelty fabrics with vintage table linens and (currently) sound nutritional advice, is a winner in my book! 

How are YOU using produce fabric?
UPDATE (8/19/13): Fabulous article on the history of US food pyramids, and best nutritional guidelines: http://www.hsph.harvard.edu/nutritionsource/pyramid-full-story/. Thanks, Linda!

Sunday, August 11, 2013

Denim Hobo Handbag: Fastest Gift Ever!

While on my denim vessel kick (which lasted for 1, 2 weeks), and my tote bag kick (always), I also made this.
It's a vessel in a way - a  hobo-style bag cut from one pair of jeans. This is an incredibly quick project - cut off the legs, sew across the bottom a couple of times for strength, stitch in the strap ends (in this case, a denim belt from a long-gone dress), and you're basically done. Neckties and other embellishments are gravy.
The hardest part for me was determining the correct way to tie the necktie. I assigned Local Teen to figure it out with the help of the Internets. So blame cyberspace for that lump on the right.
Lump notwithstanding, I'm proud to say that Local Teen said she would be seen in public with this purse! (Wearing something Mom made! Huge!)

But then we showed it to Local Husband, who took one look at it and began giggling uncontrollably. Is your mind also in the gutter? I decided that perhaps he was right - the dangling  phallic symbol tie ends were not ideal. I certainly did not want Local Teen carrying a Weiner-Filner Memorial Bag. So I untied our hard-won knot, and retied the tie into a one-loop bow. It's still got a slightly dangling end, but it's less of a protruding phallic symbol better than before. 
I made it up as I went along. When I was done, I thought about writing up a tutorial for this blog, but, being lazy, checked Youtube first. Good thing I did. There are approximately one half-zillion how-to videos for this jeans-top-to-hobo-handbag concept. Here's a really detailed one: Part OnePart Two. (Although the music is too loud in parts, you can easily figure it out.) Part Two shows how to measure for and install a lining, which I haven't done. 

If, like me, you have a vast stash of neckties, and don't know which one to  choose, remember that polka dots make everything better!

P.S. Here's an interesting variation, using a different fabric for the base and handles. 


Tuesday, August 6, 2013

Think Outside the Guild: Hang With Other Artists via ATCs

My recent participation in an Artist Trading Card (ATC) group (mentioned in earlier posts), made up of wildly diverse people, has led me to three conclusions;
  1. Fiber artists really are artists (despite what one US embassy visa officer might believe, so sign this); 
  2. Think outside the guild! Whether a person paints, draws, or stitches, we share a profound need to create in response to our inner world and the world around us.
  3. ATCs are the perfect, fun, non-threatening way to dabble in connecting with other artists. Plus, swapping makes for an excellent party!
My new ATC group is diverse in most ways: religion, ethnicity, and age. So far, I'm the only fiber artist; the others are into drawing, painting, printmaking and or collage. Interestingly, all the others are in the helping professions (except me, unless you count quilt blogging as a helping profession? Self-help?)

Our first exchange took place at an office, on a weekend; the second at a members' house. We eat fabulous food provided by our gracious host, drink a little wine or sparkly juice, talk a little about our work, and then march around the table, picking up a card from each members' pile. Most are tucked into envelopes.

Sitting down to open the envelopes is like Chrismukkah! [= Christmas + Hanukkah.]  There's always an exciting gem inside! Below are the cards that I've received in our two exchanges, and a little bit about them and their makers.

Gabri is a painter and a clergyman, and, speaking of gems, his cards have been meditations on the biblical parable about the "pearl of great price." He was so excited about our first exchange that he made and gave us each multiple cards. These are my first two from him:
 For the second exchange, he took a more ethereal approach to the pearl theme.
Jason, a Baptist pastor, reports that he is currently enchanted with calligraphy. He made the card below with acrylic and calligraphy ink, watercolors, and dip drawing pens. The series is about major population growth around rivers. "I was intrigued with how civilization sprouts around water (ie New York, Cairo, etc.), and ...the effect on water and land."  He titled the card below 'New Orleans.' The photo does not do justice to the beauty and wavy texture of the painted areas.

Jenny, who works in philanthropy, makes art using Japanese mineral pigments. The card on the right, below, also includes silver leaf.
Both cards are intricate, exquisite and serene. Jenny says the one on the left was inspired by Hawaii. It somehow reminds me of cell microscopy; to me, the card on the right evokes NASA space photos!

John Tallacksen is a talented professional artist, as well as a community organizer. The first card is a print portrait of a young "graffiti writer" he works with:
The second has to do with a family of sparrows that moved in next door. It's a hand-colored linoleum cut print. 
 
You can see (and buy) more of John's incredible work, at JohnTallacksen.com.

Karla is also a social activist, working to help bring healthy foods to urban areas. Her cards for our second exchange portrayed little-known edible native Los Angeles plants. I lucked into her beautiful manzanita card, which came with a recipe for jelly, plus the useful information that manzanita helps clear urinary tract infections!
Who knew?

My friend Marian, who brought me into this group, has an amazing eye and loves to work in collage. I love her sense of balance and drama, and her meticulous craftsmanship (she cuts out those little details incredibly accurately!) Below left is her portrait of singer Edith Piaf; there's a metal embellishment on the upper left. On the right, of course, is Sir Paul, enjoying a cuppa, and gazing at me lovingly, forevermore, with piercing hand-colored blue eyes. (Does Paul actually have blue eyes?)

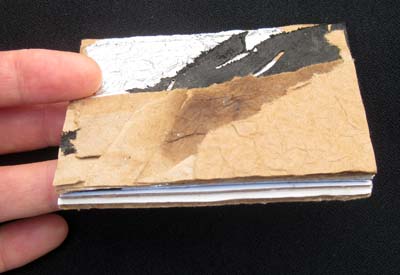
Sue works for a California foundation. Her first card is an abstract confection with layers of paint, brown paper,cardboard and tin foil.

It's about a half-in thick, giving it a fascinating packet-like heft. Side view:
Sue's second card, below, is a collage reflecting her love for California. It's hard to see in the picture, but it's an enchanting seaside scene with a tiny line of strolling fowl, and, of course, antlers.

John W is new participant  At first glance, his collaged card looks awfully cute.

At second glance, it's anything but cute. John, who is an urban pastor and a community organizer, was shaken and saddened by an article about the ongoing devastation of Chernobyl. His response was to cut up the article, and juxtapose the pieces with Mary Engelbreit's happy-sappy images, I think from a calendar. The image on the right side shows a disintegrating wall in an abandoned Chernobyl classroom, hung with portraits of Soviet leaders. Once you know what's in it, this card sizzles with outrage.

I am so grateful to Marian for bringing me into this group! I might never have had the courage to seek out an exchange group of  "2-D" artists to trade with. It's tremendous fun as well as a learning experience!

PS If you missed them, the cards I contributed are here and here.

UPDATE: If you want to find a swap group of your own,

  • Ask at your local art and/or craft store,
  •  Go to groups.yahoo.com/ and type in "Artist Trading Cards." Some groups trade through the mail; others arrange face-to-face meetings in specific cities.
  •  Check out more lists of local exchanges at Artist-trading-cards.ch/events.html