Sunday, March 31, 2013

Passover Greetings

Happy Easter Sunday and 7th day of Passover!

One of my specialties is Jewish quilting. I've made scads of matzoh covers for Passover - it would take a month of Passovers to use all of them at a rate of one a day - but here are my two favorites. Both involve delightful trompe l'oeil matzoh fabric. (You can never buy too much!)

Matzoh Cover 1: Flight from the Narrow Places   
In the Passover seder,  Egypt is called mitzrayim, which can be interpreted as "narrow place."  Some say Passover should be viewed as an occasion to plan our escape from personal or communal narrow spaces, whether character flaws (I, for one, need to stop hoarding buttons, beads and fabric), or to save the world from modern plagues like climate change and easily-available semi-automatic weaponry.

For this matzoh cover, I combined that midrash with the traditional American quilt pattern called flying geese. Usually, flying geese triangles are all the same size. In my curvy version, they appear to be flying from a distant tiny point to a spacious area. I drew the design on paper, and then foundation paper-pieced it. (But one could just as easily - or much more easily - do this with fusible applique.)

There's a hand beaded fringe all the way around. The beads near the smallest geese are black - coming from a dark place
 and the rest of the beading is blue, except at the widest edge, where it's gold.
It's all machine quilted, And three pockets were added to the back, to tuck in the actual matzot. 

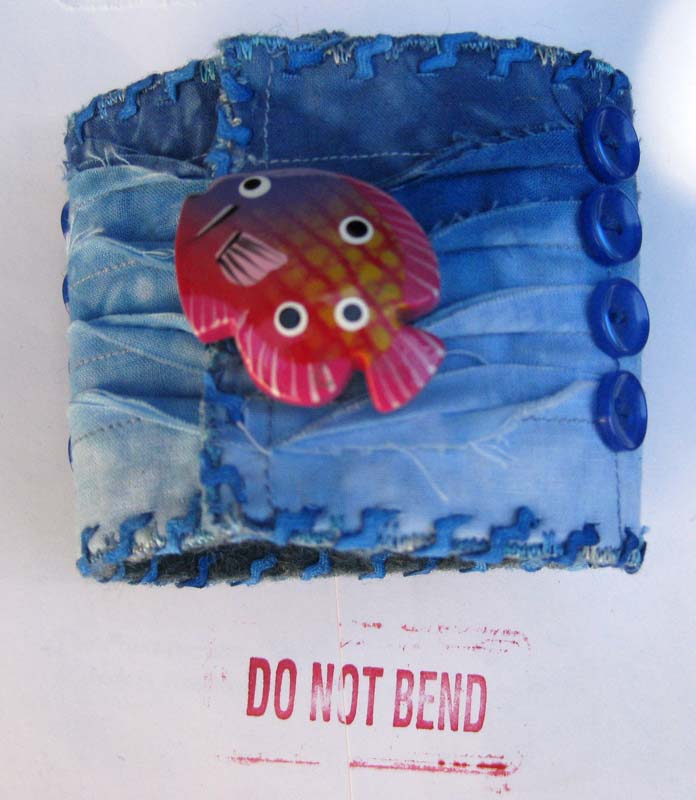
Matzoh Cover II: Button Collection
Unlike the previous matzoh cover, I can't really explain this one in any rational way. It involved a lot of color, a lot of buttons, 
...and a whole lot of zigzags.

I used the round shape to signify the shmura matzot that some traditional communities prefer to the machine-made square ones. Two more matzot are peeking out from the layers. Satin-stitched zigzags are also emerging. 
They're some kind of energy lines. To give the matzoh an authentically bumpy texture, I stitched 3-step zigzags with variegated thread in my machine top. 
Perhaps this cover is a comment on how much kinetic energy is required to clean the house and set the table for Passover, let alone to get out of metaphorical Egypt?

Or maybe it means:  If, like the ancient Hebrews, I was forced to evacuate my home due to prejudice, or here in Southern California more likely, due to earthquakes, fire, or mudslides - well, in that case I'd definitely want to bring my button, bead and fabric collections with me. But if I didn't have time to pack it all up and flee - I could just pack up these two matzoh covers for consolation.

More of my matzoh fabric obsession is here and general quilty Passover preoccupations here

Whatever you may be celebrating, hope you are having a good day!


Sunday, March 24, 2013

The 'Elvis' Altered Toy Sewing Machine

A long time ago, in the early days of the Internet, I started reading about toy sewing machines online. This was a mistake. TSMs are worse than crack. Just a few pictures, and I was hooked.   

Collecting toy sewing machines is the wrong hobby for people like me who love flea markets, thrift shops, and garage sales. In the real world (outside of cyberspace), TSMs - especially the old and charming ones - are rare. Maybe 1 in every 75 visits to a flea market. Years go by between live sightings. When I do meet one in the real world, if it is old, interesting and in decent condition, the price is usually quite high,upwards of $200. Strangely, vintage toys cost much more than vintage full-size sewing machines.

Novice desperation explains why, early in my addiction, when I saw a plain white plastic chainstitch machine at a flea market, I bought it. Though completely devoid of charm, it was small, clean and MIB (mint in box). I think I paid less than $20.  

I brought it home, popped in some batteries, and it didn't work. Total buyer's remorse.  

Then it occurred to me: I could alter it! Correction - this was long before I'd heard the terms 'altered book,' or 'altered art.' So what I actually thought to myself was probably along the lines of: "I'll Mod Podge it!" 

I pulled out my rare, high quality Elvis-themed cotton quilting fabric, and went to town with the Mod Podge, the glue gun, the trim and the tchotchkes (little sparkly things). 

Though the front image shows young Elvis, I went more with the mood of late-Elvis-in-sparkly-white-jumpsuit ("one of the most recreated costumes in history"). There's a dangly pearl ball trim around the base, silver sequins, and shiny buttons and button covers.  
I created a spool of iridescent sequins for the top of the machine. Along the top edge of the machine, there's silver-embellished blue rick-rack. 
Elvis is adoringly gazed upon by a 50's princess/debutante (Ann-Margaret?), in white gloves and gown. His crown is a former button cover.
In all the background areas, there are more clear iridescent sequins. 

Now the machine is no longer 100% completely useless! See those three pins? The machine base is covered with silver-dot-embellished-white tulle, with batting underneath, so it actually functions as a pincushion. 

 Here's the head-on view.
 
In conclusion, my friends, do you have a useless, broken, charm-free, not-worth-repairing, sewing machine? Consider altering it! (And send me pics!)

PS More creative quilt/art oriented ideas are at Nina Marie Sayre's Off the Wall Fridays:  http://ninamariesayre.blogspot.com/

Sunday, March 17, 2013

Something New: Repurposed Vintage Quilt Blocks

Let's dive back into the subject of thrift shop textiles. In our last installment, the vintage needlework treasure didn't need anything from me except a pressing, a frame, and an explanation. Though technically unfinished by the original maker, there's no way I could have made that embroidery any more enthralling.   

But then there are the textile creations that cry out for something more.

For example, several years ago, at a flea market I scored a large pile of unfinished Grandmother's Flower Garden blocks - painstakingly hand-pieced with a hexagon center, a circle of six hexagons in a contrasting  color, and a print for the outer circle of 12 more hexagons. Here are four randomly chosen blocks from the big stack.

The fabrics and color combinations ranged from charming to alarming. (That orange-and-red one is even more awful in person).

I'm guessing they're from the 1960s. Along with cottons, there are some petroleum-based fabrics, and some are pretty thin. There's no way I'd use the flimsier blocks in a pieced quilt. (Plus, there's no way I'd piece a Grandmother's Flower Garden quilt. Even with the individual blocks finished, it's still an overwhelming amount of precision handwork to join them.)

So those blocks sat in my cabinet, until the day, probably in late December, that I decided to make some last-minute holiday gifts.

I dove into my fabric stash, and came up with this:
Does it ring a bell? If you're an art quilter, or have gone to art quilt exhibits, or have read about art quilting, you might recognize this as a fabric by genius quilting superstar Terrie Mangat. (If you're not familiar with Terrie's quilts, you're in for a treat. Check out http://www.terriemangat.com/). Along with making art quilt masterpieces, Terrie designs fabric for Westminster's Free Spirit (no financial affiliation). That's what this piece is.

I couldn't collect all the awesome stuff that Terrie put on this one piece of fabric (although I've tried). Here's a closer look:

It's a wackadoodle junk drawer, and exactly what my sedate granny blocks needed.

So on some of them, I appliqued divers:


(The washed out pastel color in the first picture is more accurate.)

Here we dive into a different color scheme:


Next, I set a mermaid in yellow, purple and blue waters:


On another block, I used Terrie's pudgy cupid: 
He or she is not looking to spread love. He or she is hunting quail... 
...who frequent plaid forests. I'd pay good money for more of that bird-strewn plaid. 

Terrie's fabric also has a Santa, and I had exactly the right block for it:
There's something about the juxtaposition of edgy/contemporary with vintage/demure one that makes me laugh! I hope the original maker (who is probably about 100 now and looking down on me from assisted living wi-fi or heaven) can forgive me.

To finish these pieces, I put batting on the back, free motion quilted them, added a layer of white felt on back, cut around the edges, finished and joined all the edges with a satin stitch all the way around, and made a tiny hanging loop at the back top. They're primarily wall hangings and/or trivets, but if I'd used cotton fabric on the back, they could also serve as potholders.

So....have you refreshed any vintage blocks lately?

Monday, March 11, 2013

Help Solve a Vintage Thrift Shop Embroidery Mystery!

I have a bona fide textile mystery, and maybe you, or someone you know, can help me solve it.

In my many years as a vintage fabriholic (modern fabric, too), I have found many stitched treasures in thrift shops. But nothing compares to this one. And, in fact, this one didn't even  happen to me, directly. My Arizona cousin Nina  found it in a thrift shop (for $2), and she sent it to me for my birthday last month. 

The more I look at it, the curiouser I get, and I think you will, too. It's about 12.5" x 24" single layer, with raw edges. The backing is a coarse red linen, almost burlap.  Here's the overview.   
All the stitching is done by hand. There's a big sun, the words "happy birthday" chain-stitched across the top. There's a couple on the right side. The woman is wearing a glorious gold print that has a French Provincial look. She's probably awaiting limbs.  The man holds what appears to be a golf club in his right hand,
and an eggplant in his left. No, I'm not kidding: 
If that's not an eggplant, then I don't know what.

At the center left, there's a floating appliqued blue linen shape that looks like it was meant to be a dress for another, buxom figure.
The outfits are appliqued with a dense, remarkably even blanket stitch. The skin is executed  in a chain stitch.  These stitches look big on your screen, but they're actually tiny. 
Pretty darn cool, no? This stitcher had talent. 

 Down along the right side, there's what is probably a date, chainstitched in Roman Numerals. 
It reads 9-7-38. Was that the birth date of the giftee, or the birthday at which this textile was to be presented? Or the date of an eggplant-themed golf tournament? Or something else entirely?  

Because the mystery is about to deepen. Down the left edge, there's a large beige silk rectangle:
At the top of the rectangle, there's a purse or treasure chest, executed in incredibly tiny stitches, with a single elongated diamond shaped rhinestone sewn in it. It's a very old-fashioned rhinestone, not shiny at all, with a black metal backing and tines.
Below that, there's a sort of cross of dark and light purple and rose. I can't even guess at what this was supposed to be. Crossbow? Esoteric Masonic symbol? Weirdly dissected eggplant with pink smoking pipe hidden inside?  
Below that, there's something that looks like a mug with an unfinished brown handle, and a sign or a teabag hanging down from it.  And now it gets really good: 
The hanging sign says: USSR!!! 

USSR?!? Are you KIDDING me? Could this be, like, a SPY textile? Is there a secret message? Will the FBI be knocking on my door soon? Should I run from my house like Alan Arkin, screaming "Egermancy!  Everybody to get from street!"? (Thanks, Howard.)

As if to acknowledge the ignition of my burning questions, two inches below the cup, there's this:   
A purse with a question mark, hanging from a tree. Is this like Whittaker Chambers' microfilm pumpkin patch? Except it's an eggplant patch? 

Don't laugh: There's more agriculture coming. To the right of the question mark suitcase, the word "if" is  executed in purple cursive. After the 'f' comes something that is almost but not quite a dollar sign (brown borders with white stripes); and the black cord looks like a hose, with a gold nozzle, spewing out silvery blue bugle beads. 
The hose appears to be watering crops. And there's foliage with delicate 3-D green leaves that appear to be remade from green ribbon.

And that's it! The only other information is that the back is a little messy, but not too bad. Did a talented child  or teen make this?
So I'm throwing this mystery open to the world! What do you think? Have you ever seen anything like this? Does it ring a bell? Do you know anyone who might have an idea?

Sunday, March 3, 2013

Quiltlet #9: The Back is Better

Has it ever happened to you that after you've pieced something, you hold it up and look at the front side, and then the back side, and then you realize that the latter is a lot more interesting than the former?

It happens to me often, especially when I make log cabin blocks. But 99.93% of the time, I do the conventional thing and say a lingering, sad, forever farewell to the wrong side as I lay it against the quilt batting and entomb it. (Perhaps someday we'll be able to lower tiny cameras in our quilts so we can admire the reverse sides.)

On extremely rare occasions, i.e. only this one time, I go for backwards! Below is the 2.75" x 9" quiltlet above, closed, as a wrist cuff (napkin ring, paperweight, etc). The fish is actually a wooden button cover, with a button underneath. 
(Just kidding about the bending. I photographed the bracelet on an old envelope.) I used five shades of gradation dyed fabric. The seam allowances are pushed in alternating directions, up and down, and held in place by buttons.
I backed the pieced strip with a single layer of embossed felt (sold in sheets at the craft store).
 Along the top, towards the right, there's a straight stitch of thick dark blue embroidery thread at the balance point of the quiltlet. If I decide to hang it from a nail, that's the spot. To close it as a bracelet, I use the large metal hook down the left side.On the front, there's another large stitch of blue embroidery thread for it to hook onto. (Look for it along the left edge in the first picture above).

Are you wondering about the edge treatment? It's pretty cool in the sense that achieving it gave me an an excuse to buy yet another fascinating though not necessarily lifesaving and, let's face it, totally self-indulgent, sewing notion:
It's called an Edge Perfect Blade, by Olfa (no financial affiliation!). It's inserted into a regular rotary cutter handle, and cuts evenly spaced slits. Watch it in action on this video. (A similar product by a different manufacturer is here; I haven't tried the latter.) One of my excuses for buying it was that I crochet, so I might someday use it to add crocheted edging to a quilt. That day has not yet arrived, of course.

I found some vintage tiny white rick-rack, painted it marine blue with Liquitex acrylic paint (in an uneven coat, on both sides), let it dry, then wove it around and through the rotary-cut slits.This edging treatment came to me, literally, from amazing Florida quilter Lori Weiss, who edged a fabric postcard with a narrow  rainbow-colored rickrack through the slits, which sent me over the moon! Thank you, Lori!

Do you have any interesting rotary cutter blades, edge treatments, and/or quilts that show the backside of your piecing?

PS Shared on Nina Marie Sayre's Off the Wall Friday, at http://ninamariesayre.blogspot.com/. Wonderful art by lots of people there!